Fallback Page Setup Guide: Creatives Free From Platform Re-Review

The most painful part of running ads is creative limitations — as platform review tightens, the room for copy, visuals, and buttons keeps shrinking. Every first-hop landing page is a tradeoff between compliance and real conversion, and the resulting page is bland with mediocre conversion rates.
DeepClick's Fallback Page gives you a fully free landing layer. It happens after the user has already left the ad platform — its creatives don't go through platform re-review, so you can put anything you want.
🎯 Core idea: The first-hop page is for review. The Fallback Page is for conversion. Two layers, fully independent, so you can run campaigns smoothly while pushing conversion freely.
This guide walks you through two things: Step 1, create a landing page in the "Fallback Page" module; Step 2, mount it on a ReflowLink in "ReflowLinks." Two steps and reflow traffic automatically enters its dedicated landing page.
Want to understand what users actually see and why this brings 10-20% extra clicks? Read first: Fallback Page: 10-20% Extra Clicks From Bounce Traffic. This article focuses on backend configuration.
Before You Begin
|
Required |
Description |
|---|---|
|
DeepClick account |
A login-ready account |
|
Landing page creatives |
Main visual images / videos for each page in the Fallback Page |
|
Navigation targets |
Where the user goes when they click: a Link URL, a custom address, or another product from your Product Library |
|
A ReflowLink |
The Fallback Page only takes effect when mounted on a specific ReflowLink |
💡 Tip: A Fallback Page is whole-page clickable — clicks anywhere on the page navigate to your configured target. Design your creatives as complete visual lead-ins so every click drives conversion.
Part 1: Create the Fallback Page
Step 1: Open the Fallback Page Module
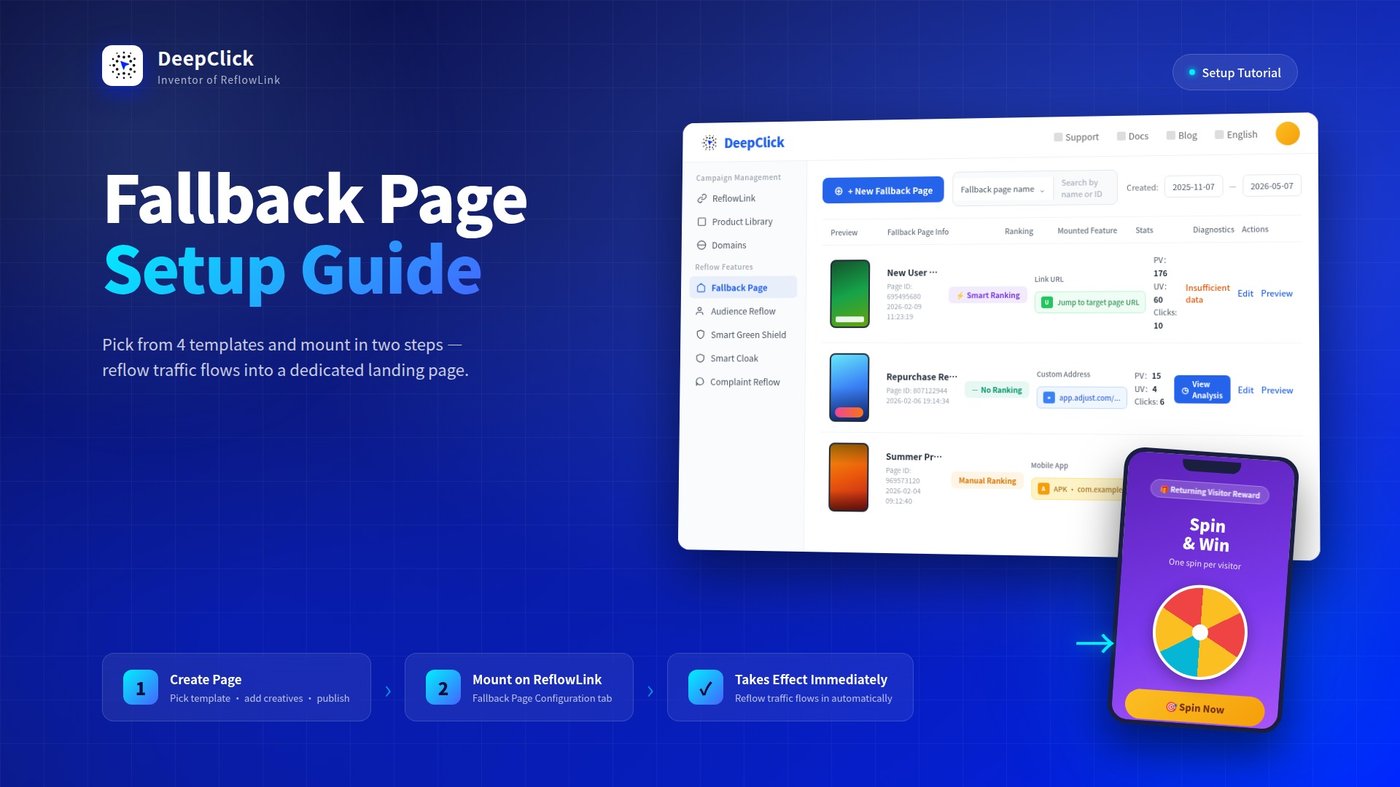
Log in to DeepClick Platform. In the left sidebar under "Campaign Management," click "Fallback Page."

You'll see the Fallback Page list view. Each row shows one created page along with its core data.
Step 2: Browse the List, Understand the Key Fields
Each row in the list contains:
- Preview: visual thumbnail of the landing page
- Fallback Page Info: name, page ID, creation timestamp
- Ranking Mode: whether "Smart Ranking" or "No Ranking" is in effect
- Mounted Feature: the navigation target (Link URL / Custom Address / Other Product)
- Stats: PV, UV, click count
- Diagnostics: system-flagged health status of the landing page
- Actions: Edit, Preview

Step 3: New Landing Page → Pick Template + Smart Ranking + Name
Click "+ New Landing Page" in the top-right; the New Fallback Page panel slides in from the right. Three things to do in this single panel:
① Pick a template
The system offers 4 templates:
|
Template |
Visual signature |
|---|---|
|
TT-Style Feed |
Mimics TikTok vertical video — full-screen background + interaction icons + bottom CTA card |
|
Clean Video Stream |
Full-screen video ad (video only) + bottom CTA strip |
|
Meta Feed |
Recreates Facebook feed sponsored content |
|
Plain Single-Page |
A complete main visual + a single bottom action button |
Not sure which one to use? Create several and let Smart Ranking below find the most effective one automatically.
② Smart Ranking toggle
Below the template selector, the "Smart Ranking" toggle is on by default, marked "Strongly recommended." The system shows the official explanation right below the toggle:
The system automatically combines and ranks pages based on the creatives you add and real campaign data. Enabling this brings +6% reflow effectiveness.
Keep it on by default — unless you want to manually control the display order of each creative page.
③ Enter a name
The bottom field takes a Fallback Page name (backend identifier only — not shown to end users).
Once filled in, click "Next" in the bottom-right to enter the editor.

Step 4: Use the Editor to Configure Each Page
Once you've picked a template, the editor opens. The editor has three columns — left: page list (1 page by default; click "Add Page" to add more), center: live preview of the current page, right: configuration form for the current page.

Per-page configuration (using TT-Style Feed as an example; other templates differ slightly):
- Format: Video Ad / Image Ad (note: Clean Video Stream is video-only)
- Set Avatar & Username: pick a publisher account — its avatar and username auto-populate the user-facing display
- Creative Asset: upload from local or pick from the asset library. The form shows a hint right inline: this creative will not trigger review — using assets different from your usual ones works better
- Set Ad Copy: the description copy users see
- Set Action Copy: the text on the CTA button
- Button Navigation Target: Link URL / Custom Address / Other Product (see table below)

The button navigation target supports 3 types:
|
Type |
Use case |
|---|---|
|
Link URL |
Navigates to the configured Target Page URL of the corresponding ReflowLink |
|
Custom Address |
Navigates to a custom deeplink or URL with parameters |
|
Other Product |
Navigates to another product from your Product Library. The system's hint reads: "Configure a different product and content from the first hop — conversion improves" |

💡 Advanced: place multiple products in a multi-page structure — one Fallback Page mounting creatives for several products simultaneously, with each page navigating to a different one. A single ReflowLink can carry secondary conversion for multiple products at once.
Step 5: Save and Publish
Once all pages are configured, click "Publish" in the bottom-right (the "Exit" button on the left lets you abandon your edits). The landing page returns to the list, ready to be mounted on a ReflowLink.
That completes the Fallback Page itself. The next step is to mount it on a specific ReflowLink to take effect.
Part 2: Mount the Fallback Page on a ReflowLink
Step 6: Open the ReflowLink Editor
Go to "Campaign Management → ReflowLinks." Find the link you want to mount the Fallback Page on, and click "Edit."
💡 Tip: If you don't have any ReflowLinks yet, click "New ReflowLink" first and walk through the 4-step creation wizard. The following steps also apply to step 2 of the new-link flow.
Step 7: Switch to the "Fallback Page Configuration" Tab
In the link editor, you'll see several tabs on the left or top: Campaign Setup / Fallback Page Configuration / Complaint Reflow Setup / Basic Info. Click "Fallback Page Configuration."

Step 8: Select the Fallback Page to Mount
Click "Select Fallback Page." A selection panel pops up. Tick the page you just created.

After mounting, the selected page shows up in the configuration tab.

Step 9: Save the Link
Click "Save" in the top-right (or "Publish" if you're in the 4-step wizard). The configuration takes effect immediately — from this moment on, reflow traffic on this ReflowLink enters the Fallback Page you just mounted.
What Happens After Configuration
Once mounted, the reflow traffic distribution logic becomes:
```
Trigger Action Page User Sees
────────────────── ──────────────────────
First click on the ad → First-hop landing page
(the standard review page)
Return / re-enter → Fallback Page
(back button / switch back) (the one you just mounted)
↓
Click anywhere on the page
→ navigates to your target
```
From now on, secondary visit and click data starts accumulating on this ReflowLink. Back in the "Fallback Page" list, the Stats column for each row shows that page's PV, UV, click count. The Diagnostics column has a "View Analysis" entry that opens a more detailed analytics panel.
About the User Experience
After configuration, run the entire user path on a real device yourself — see how the Fallback Page renders on actual hardware: visual clarity, complete creative loading, correct navigation.
If you want to learn:
- The scenarios where reflow gets triggered (return / re-enter)
- What each template looks like on the user side
- The design logic behind whole-page clickable
- Why this mechanism reliably brings 10-20% extra clicks
- The advanced multi-page structure + Smart Ranking play
Read: 👉 Fallback Page: 10-20% Extra Clicks From Bounce Traffic
For configuration issues, contact your dedicated Customer Success Manager, or reach out via the contact entry on DeepClick Platform.