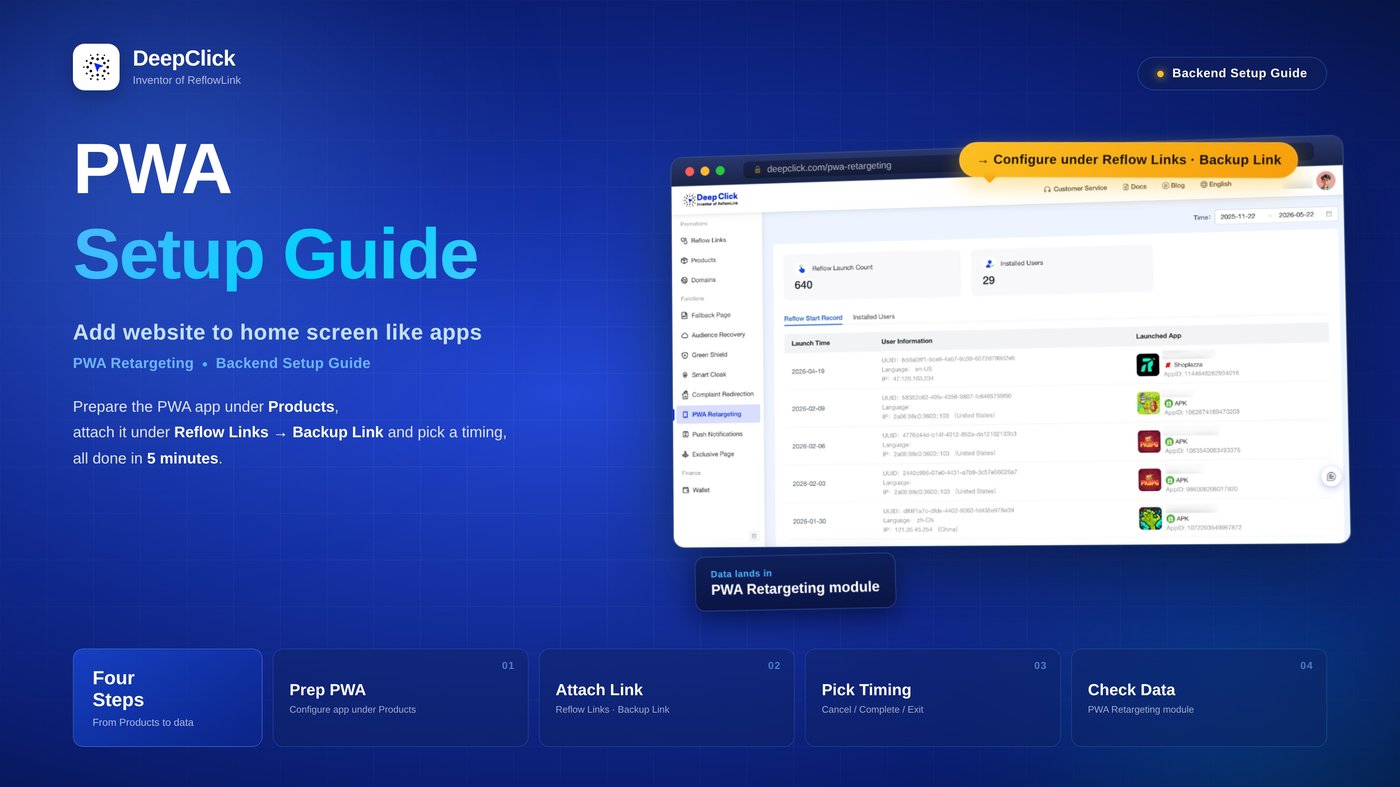
PWA Retargeting Setup Guide: Add Your Website to the Home Screen Like an App

Want to understand how PWA Retargeting works, its prompt timings, and its core value first? Read the companion article: PWA Retargeting Overview: Bypass Platforms, Zero Coding. This article focuses on the backend setup.
Setting up PWA Retargeting takes just three steps:
- Products — prepare the PWA app (app name, icon, redirect URL, launch domain)
- Reflow Links — attach the Backup Link and pick a guide popup timing
- PWA Retargeting — check launch data and installed users in the module
The whole flow takes under 5 minutes. Below is the detailed breakdown in that order.
Before You Start
|
Requirement |
Notes |
Where to prepare |
|---|---|---|
|
DeepClick account |
Any account that can log into the DeepClick Console works; no extra permissions needed |
deepclick.com |
|
A PWA redirect URL |
Where users land after tapping to install the PWA |
Prepared by your operations/tech team |
|
PWA app assets (website products only) |
App name + app icon + detail images, used to present it as a native-looking app |
Prepared by your designer |
|
A Reflow Link you plan to run |
PWA Retargeting must be attached to a Reflow Link's Backup Link to trigger |
DeepClick Console → Promotions → Reflow Links |
💡 PWA Retargeting supports two product types: Mobile Apps (APK) and Website Conversion (WordPress / WooCommerce / Shopify, etc.). Google Play / App Store products are already distributed through the app store and are not eligible for PWA Retargeting.
Part 1: Configure the PWA App Under Products
All PWA assets and the redirect URL are configured under Products. APK products and website products are configured slightly differently — both cases are covered below.
Step 1: Open Products
After logging into the DeepClick Console, go to Promotions → Products in the left sidebar.
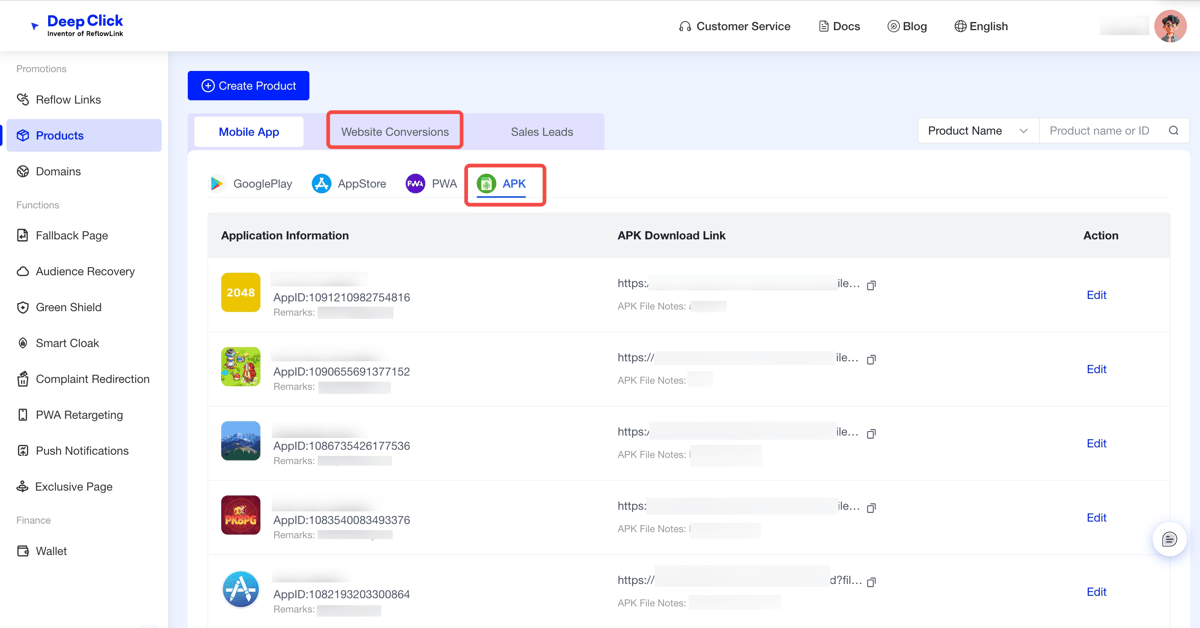
At the top you'll see two tabs: Mobile Apps and Website Conversion. The PWA configuration differs between them, covered separately below.
Step 2a: APK products — attach PWA under "Backup Link"
Open the Mobile Apps tab, click "New Product" and choose the APK type (or edit an existing APK product).
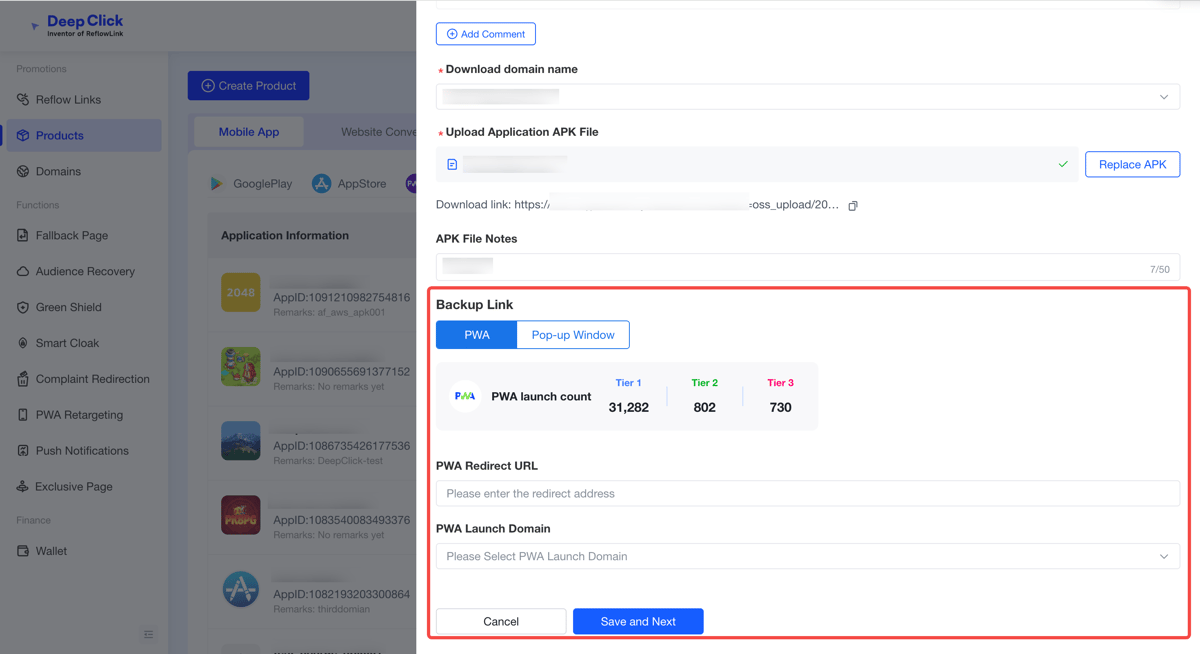
After filling in the basics (app name, AppID, APK file, etc.), scroll down to the Backup Link area — the key location for PWA configuration:
|
Field |
Notes |
|---|---|
|
Backup Link type |
Choose PWA (the other option, "Popup," is for a popup button redirect that doesn't install a PWA) |
|
PWA Launch Volume |
Shows your account's purchased Tier 1 / Tier 2 / Tier 3 quota (consumed when users open the PWA) |
|
PWA Redirect URL |
Where users land after tapping to install the PWA |
|
PWA Launch Domain |
The domain the PWA registers under on the home screen when installed; pick from the available-domains dropdown |
💡 How to fill the PWA Redirect URL: we recommend registering a ROIBest account and generating a professional PWA link through the ROIBest console.
Step 2b: Website products — configure "PWA App Settings"
Open the Website Conversion tab, click "New Product" and choose WordPress / WooCommerce / Shopify / Website, etc.
For website products, the PWA configuration area is called PWA App Settings, and it needs more complete assets, because the whole PWA is essentially "a website disguised as an app."
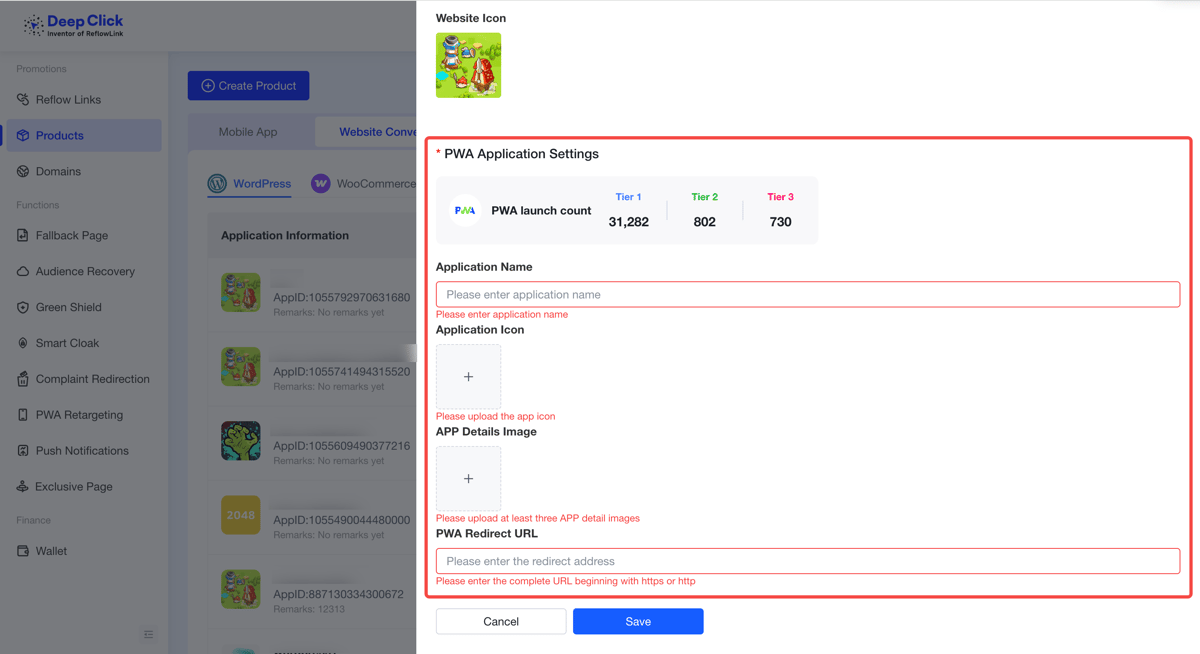
Key fields:
|
Field |
Notes |
Required |
|---|---|---|
|
App Name |
The name shown under the home-screen icon |
✅ Required |
|
App Icon |
The home-screen icon itself, square, 512×512 PNG recommended |
✅ Required |
|
App Detail Images |
Detail images shown on the install page, up to 4, to showcase the app's features |
✅ Required |
|
PWA Redirect URL |
Where users land after tapping to install the PWA |
✅ Required |
⚠️ App Detail Images are the key persuasion assets — use real product screenshots, styled like those in the App Store / Google Play (product UI snippets, gameplay/selling-point shots, poster-style hero images) — don't just drop in a logo.
Part 2: Attach to a Reflow Link and Set the Popup Timing
After configuring the PWA under Products, you still need to attach it on a Reflow Link to actually trigger it. This step decides "when to pop up and whom to guide toward installing the PWA."
Step 3: Open the Reflow Link editor
Go back to Promotions → Reflow Links, create a new link, or edit an existing one.
In Step 1 "Campaign Setup," set the product to an APK or Website Conversion type (Google Play / App Store products won't show the PWA Backup Link config).
Continue through the wizard to the Backup Link step:
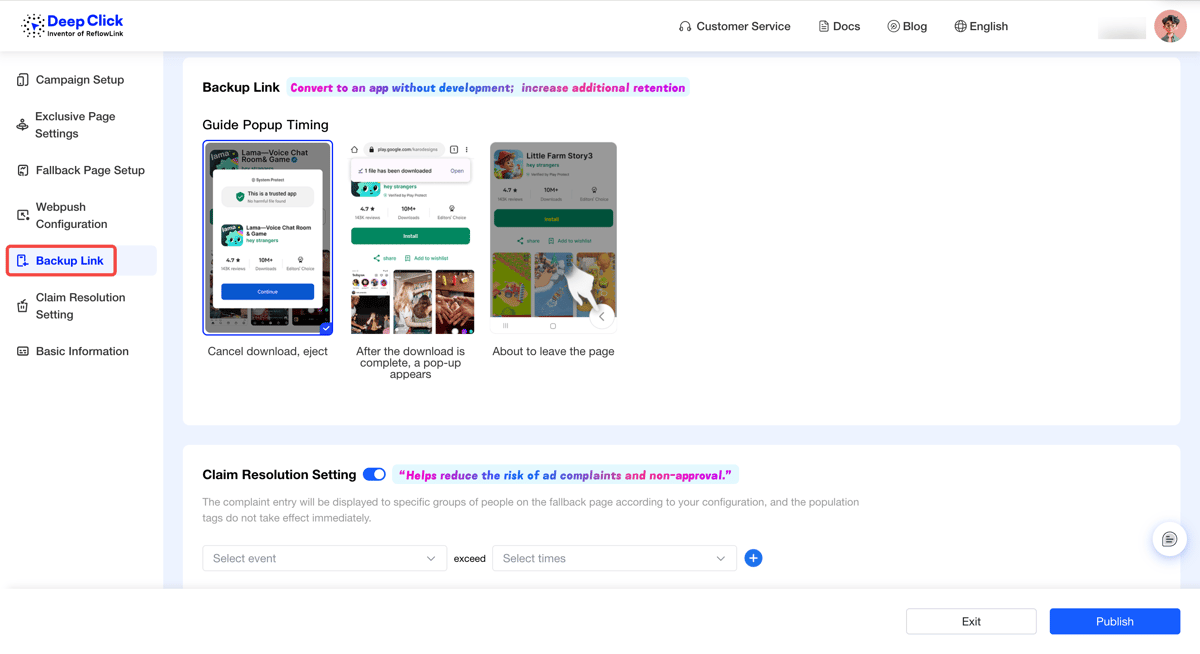
💡 Can't find "Backup Link"? Check the product type you chose in Step 1 — only APK and Website Conversion products have this step. If you picked Google Play / App Store, no PWA-related config appears in the wizard.
Step 4: Choose the guide popup timing
The core setting in the "Backup Link" step is Guide Popup Timing — it decides at which moment in the user journey the PWA install prompt fires.
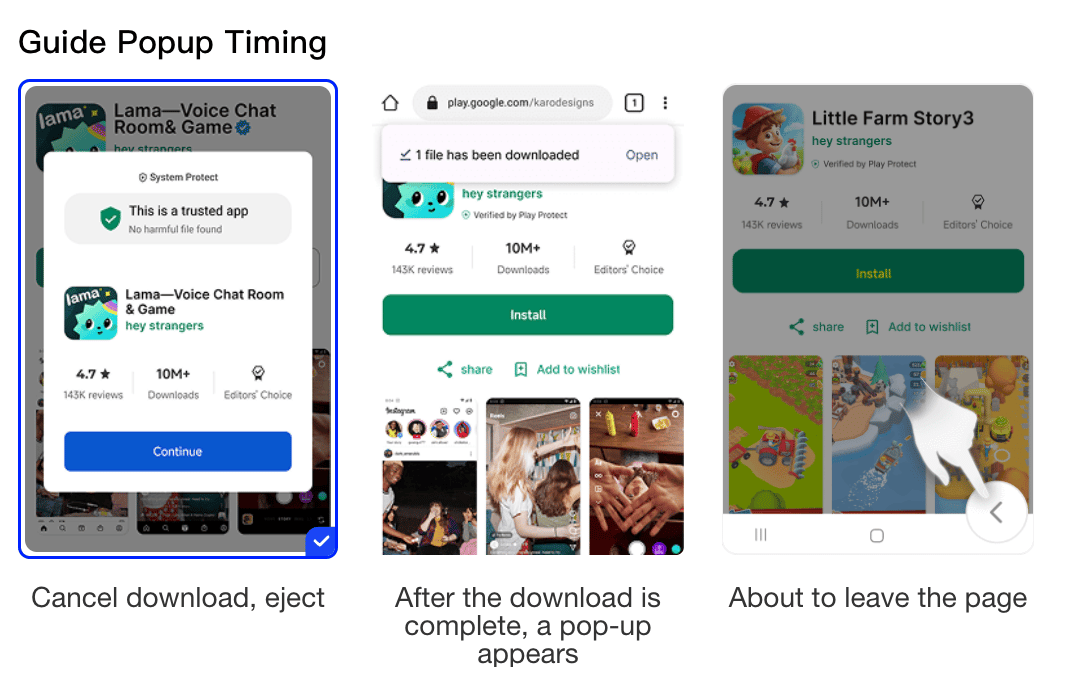
The system offers 3 timings, each matching a type of user behavior:
|
Timing |
Trigger condition |
Best for |
|---|---|---|
|
Cancel download, eject |
User taps download, then cancels / closes the prompt |
The key moment when users start to hesitate — most commonly used |
|
After the download is complete, a pop-up appears |
The prompt fires right after the APK finishes downloading |
When you want to add a retention hook while the user is hottest |
|
About to leave the page |
User is about to leave (mouse to close, back gesture, etc.) |
The final retention attempt, covering users who didn't download / didn't finish |
💡 Which to pick first: for your first PWA Retargeting setup, start with Cancel download, eject. At this timing the user has already shown download intent but pulled back — the highest-converting window for a PWA prompt. You can layer on the other timings later based on data.
After choosing the timing, click Publish in the bottom-right to finish the Reflow Link setup.
Step 5: Wait for data after going live
Once the Reflow Link is published, run it on Meta / Google or other ad platforms as usual. After a user completes the full path — "click ad → land on page → hit popup timing → see PWA prompt → install to home screen" — they're recorded as a PWA installed user.
After that, every time the user opens the PWA from the home-screen icon triggers one PWA launch (consuming PWA launch volume).
Part 3: Check PWA Retargeting Data
Step 6: Open the PWA Retargeting module
In the left sidebar, go to Functions → PWA Retargeting to open the data view.
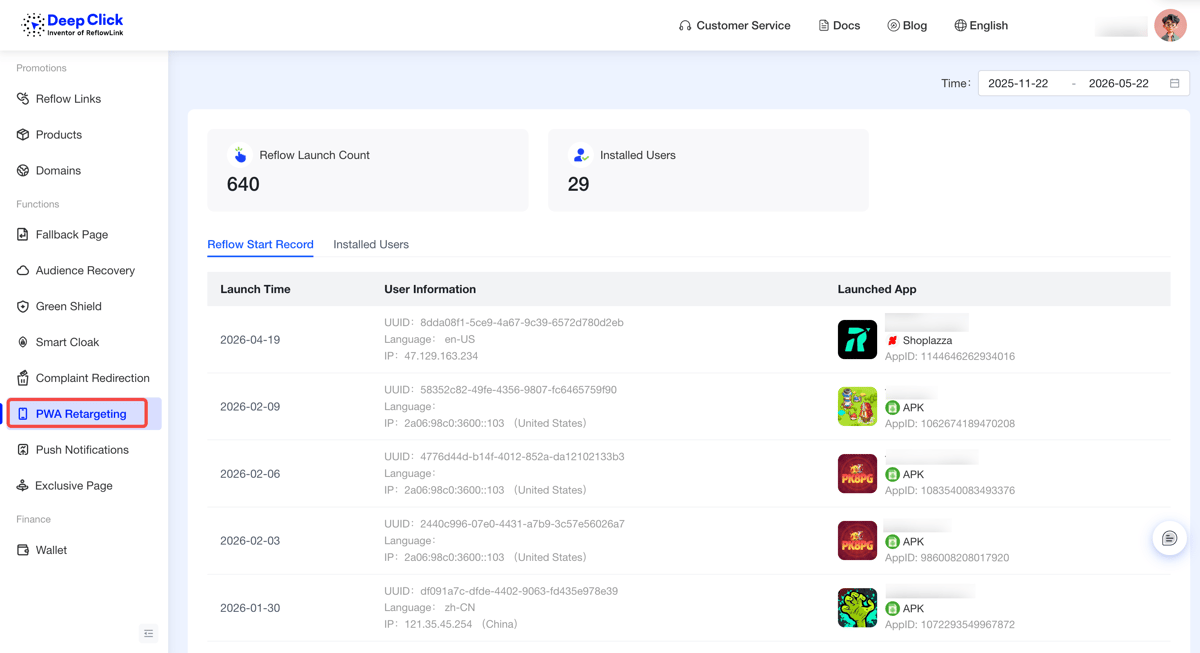
The two cards at the top directly reflect the overall impact of PWA Retargeting:
|
Card |
Meaning |
|---|---|
|
Reflow Launch Count |
Cumulative number of times the PWA was opened from the home screen (multiple opens by the same user accumulate) |
|
Installed Users |
Number of users who successfully installed the PWA app via the prompt |
Supported filter: date range (defaults to the last 30 days).
Step 7: Check launch records and installed-user details
Below the cards are two tabs: Reflow Start Record and Installed Users.
Reflow Start Record
Each record represents one PWA launch. Key fields:
|
Column |
Meaning |
|---|---|
|
Launch Time |
Timestamp of when the user opened the PWA |
|
User Information |
UUID (device identifier) + language + IP (with country) |
|
Launched App |
Which PWA the user launched (icon + app name + AppID) |
Installed Users
Switch to the "Installed Users" tab to see the list of users who installed successfully via the PWA prompt.
💡 If you still see no launch records a while after going live, check in order: ① is the Reflow Link actually published; ② is the Backup Link popup timing selected; ③ does the Products PWA Redirect URL open normally.
After Setup: FAQ
Q1: Is the PWA Retargeting module just a dashboard — can I change config here?
No. The PWA Retargeting module only displays data — Reflow Launch Count, Installed Users, launch records. All configuration (PWA redirect URL, app icon, popup timing, etc.) is changed in its respective location:
- To change the PWA app itself (redirect URL, domain, icon, detail images) → edit the product under Products
- To change the popup trigger timing (cancel download / after download / about to leave) → edit the corresponding Reflow Link
Q2: Can one product have multiple PWA redirect URLs?
Each product supports only one PWA Redirect URL under Products. If you want to test different redirect pages, create multiple products and attach them to different Reflow Links for A/B comparison.
Q3: How is PWA launch volume billed?
It's deducted once per PWA launch. Multiple opens by the same user are billed repeatedly, with no deduplication — which is exactly the "ongoing retention value" of PWA Retargeting: every time a user comes back, it means one more free touchpoint outside ads.
Launch volume is priced separately by region across Tier 1 / Tier 2 / Tier 3; you can see your current balance in the "Backup Link" area under Products. When you're low, go to Wallet and contact your business manager to top up.
Want to Understand How PWA Retargeting Works and Why It Matters?
You've finished the setup, but if you want to dive into the design rationale behind PWA Retargeting, the conversion logic of each of the three prompt timings, and how it differs from native-app advertising, read the companion article:
👉 PWA Retargeting Overview: Bypass Platforms, Zero Coding
If you run into any issues during setup, feel free to reach out to your customer success manager or DeepClick customer support. Here's to strong retention numbers from your PWA Retargeting 🚀
